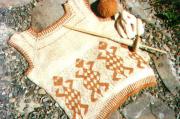
Anasazi Cotton
Spinning Cotton on a Hohokam-Style Spindle
Ancient tool, new twist
by Connie Delaney
When I started looking into how to spin with a Navajo spindle, I found very little information. The two spindles I owned were very different in size and came with no instructions. I searched through back issues of Spin-Off Magazine and through all my spinning and weaving books for tips. Eventually I pieced together enough information to begin making yarn, and learned some interesting history.
A little history
The Navajo tribes were originally from northwestern Canada. They migrated south sometime in the 1300s or 1400s and learned spinning and weaving from the Pueblo people who spun cotton. The Spaniards didn't bring sheep into the Americas until the late 1500s, so the Navajo started their spinning careers with cotton.
``Cotton?'' I thought. ``Hmmmmm . . . '' I dug into my stash of spinning fibers to try some cotton on my Navajo spindle. It worked like a charm. The only problem was getting enough twist into the yarn. My interest was sparked.
I started prowling through libraries and reading books on southwestern people. I traveled to Salt Lake City and there, in the Natural History Museum at the University of Utah, I discovered two skeins of cotton singles that had been beautifully spun a thousand years ago. One of these ancient skeins was spun thick and the other thin. Each was kinky with twist and rolled into a hank, in the same way we do it today. I wanted to touch them, but they were guarded by glass.
Cotton has been cultivated in South America and the southwestern United States for centuries. The climate has changed a few degrees here and there over time. When it was warm, cultivated areas shifted northward, then cold spells pushed the farmers and their fields back south. The prehistoric southwestern peoples, whom we usually call the Anasazi, disappeared suddenly around 1300. Shortly afterward, the Hohokam tribes built their cities somewhat to the south of the ancient’s prehistoric caves. Then they, too, disappeared. When the Navajo tribes, and later Europeans, came to the area, they found tribes such as the Hopi, Pima, and Zuni living in small pueblos --growing and spinning cotton.
Using the word “Anasazi†for the ancient Indians of the southwest is actually quite rude in the eyes of the Pueblo Indians. In fact, calling them "Pueblo" is also a bit rude. “Pueblo†is Spanish meaning “village,†and refers to the fact that the people live in villages, disregarding their actual identity as the Hopi, Pima and Zuni. “Anasazi†is a Navajo word which means “Enemy Ancestors.†It expresses a lot of fear as the Navajo were deeply superstitious about the artifacts which these ancestors of their enemies had left about the landscape. The word “Hohokam†is more correct as it is from one of the Pueblo tribes and means something like, “All gone now.†Typical of our English tongue we have mismashed all these languages into common use.
The spindles found in prehistoric southwestern Anasazi and Hohokam ruins are different from the spindles used by the Navajo today. They are shorter--about 18 inches long--with small whorls about 1 1/2 to 2 inches round. On my second trip to the Utah Museum of Natural History, Kathy Kankainen, Collections Manager, took me into a back room. There she let me see one of their more recent finds: a beautiful spindle about 15 1/2 inches long, pointed at the top and worn shiny at the bottom from much spinning. I didn't get to touch it either. It was way too precious for my oily hands--but my fingers are still itching.
Fortunately for modern spinners, the materials for making a Hohokam-style spindle are inexpensive and easily available in any craft store; little toy craft wheels are the perfect size. And I can touch my own little spindle as much as I want.
Making a Hohokam-style spindle
Materials:
(Total cost is under a dollar)
One 2-1/2 inch wooden toy wheel from a craft store for the whorl
18 inches of dowel to fit through the hole of the whorl (most wheels take a 3/8-inch dowel)
Pencil sharpener with a large hole
Sandpaper
Wood glue
Prepared cotton roving for spinning
Directions
Sharpen both ends of the dowel with the pencil sharpener and then sand smooth. Don't make the tipS [which tip? both tips? top or bottom? --BOTH] too sharp. Slip the whorl onto the dowel so it is about 5 1/2 inches from the bottom. Use a drop of glue to secure it in place. Let the glue dry, and you're ready to spin!
Rolling the spindle on the leg
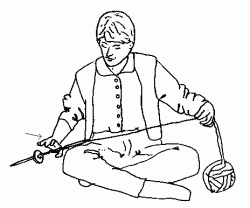 | Sit cross-legged on the floor and practice twirling your spindle a few times. Rest the tip of the spindle on the ground to your right side. Roll the spindle up your leg--from knee to thigh--with your right hand; catch the shaft so it rotates between your thumb and forefinger. Repeat this action until you feel comfortable. |
When you sit cross-legged, you will appreciate the wisdom in spinning up your leg and thereby inserting a clockwise twist into the yarn; you are actually twirling the spindle downhill because your knee is a bit higher than your hip. Wonderful, isn't it?
While you are at it, practice spinning the spindle in a counterclockwise direction. Roll the spindle from your upper thigh down to your knee, catching it in the curve of your fingers. This is the direction for plying.
Left or Right?
I first learned to spin on a drop spindle and I always draft with my left hand even though I am right-handed. Some people who learn to spin on a spinning wheel learn to draft with their right hand. These instructions are for drafting with your left hand. If you can't get it, you may want to reverse the instructions.
The spit join
Pick up the end of your cotton roving, wet your fingers, and wet the tip of the cotton (or go ahead and spit directly on the cotton). Stick the tip of the shaft into the wet cotton and twist the spindle clockwise. The cotton will stick right to the shaft. After it has caught pretty well, slide the sticky spot down the shaft to the whorl. That's how you tie on.
If you can't get this technique, go ahead and do it the normal way--twist the cotton fibers into a short strand of yarn and tie or wrap it onto the shaft of the spindle.
Spinning
Rotate the spindle clockwise up your leg. With your left hand, pull away from the spindle on the cotton with your left hand, using gentle tension and letting a small glob of cotton into the twist. Then continue pulling at an even speed, letting the glob even out into the twist. But don't pull too far or your roving will fall apart. If you are having trouble, you may be holding the cotton too close to the twist. Move your hand further up the roving and pull slowly, watching how the cotton evens out. This action is called a long draw.
If you are working with very short fibers, such as most colored cottons, you may have difficulties with this style of long draw. The fibers just aren't long enough to accommodate the pull. Instead of letting the fibers move into the twist in a glob, you will have to watch closely where the twist meets the roving and pull backwards from there in a steady, even motion. This kind of draw is called point-of-twist drafting. Some spinners find it a bit tricky to master. Keep your eyes glued to the point of twist and pull gently but steadily with your left hand.
Don't fret if you have lots of lumps--keep practicing over and over. In time you will build your skill.
Winding on
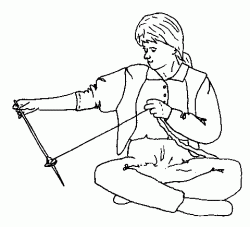 | When you have stretched your arm out as long as it can go, unwind the yarn that winds around the shaft as you spin and stand the spindle upright on the floor. With your right hand, twirl it clockwise so the roving winds onto the shaft, close to the whorl. Wind a nice tight cone, leaving enough yarn to wrap up the spindle for the next spin. |
Lay the spindle back on your leg, and give it a few twirls, then draft the roving again.
Repeat until your roving is used up or the spindle is full.
Joining breaks
If you are having trouble with the yarn breaking, you are probably allowing it to get too thin. The Navajo spindle puts no tension on the yarn so it is easy to pull the strand quickly and lose the integrity of your yarn. Pull slowly, and try to spin a thicker yarn--you can make contest-thin yarn later. The long draw is like riding a bicycle; all of a sudden the motion will seem natural and you'll be spinning effortlessly.
Breaking yarn can be quite frustrating, especially if it breaks because you allow it to get too thin. You may find that a foot or so of your yarn loses its integrity and the end of the yarn keeps breaking and breaking until you finally come to a stretch that has retained its twist. Unwind your spun yarn until you find some with enough twist to stay together. Feather out the end of the yarn and intertwine new fibers from your roving into the twist. Spin the spindle and add twist until the yarn grabs into the roving. Continue spinning, but get more fibers and twist into your yarn from now on!
Spinning tips
Do not try to pull straight off the tip of the spindle, but rather hold the strand at about a 45° angle. As you work, you will develop a feel for the yarn. The twist adds strength. At first, the yarn will seem to float in the air, then all of a sudden the twist will grab on and the yarn will magically tighten and strengthen, ``snapping'' off the tip. Keep spinning each length until the yarn is snapping distinctly. This will even out the last few lumps and it's a good test for strength.
If things are not going well and lumps are staying in your yarn, stop spinning and use both hands to untwist the thick spots and pull them thinner. Then start spinning again. Even the most experienced spinner will stop occasionally to even out the yarn.
How thick you make the yarn, and how much twist you add, is a matter of design. If this is a singles yarn, you will want just enough twist to secure the fiber without making it too dense or kinky. If you plan to make a two- or three-ply yarn, spin the singles much tighter. Experience is the best teacher--if you are a beginner, play with the twist and learn how it behaves. Most ancient spindle-spun yarns were singles and the Navajo today use most of their wool as singles, choosing two-ply or the famous Navajo three-ply only for the edges of blankets.
Navajo spinners spin their yarn two and sometimes even three times. They do this so they can even out any lumps and add more twist and strength. Perhaps the prehistoric Puebloans did the same. If you are going to be plying your yarn, you may want to add a second spin because a plied yarn needs more initial twist than a singles. Simply roll your yarn into a ball and spin it again onto the spindle, adding as much twist as you wish. You can tell if your yarn has enough twist for a plied yarn by letting a strand twist back on itself. This is how your plied yarn will look once the two strands are wrapped around each other. [illustration?]
Making a Navajo three-ply yarn
Here's a nifty way to make a three-ply yarn. To get ready, roll your singles yarn into a ball with the yarn end tied to the spindle. Make a loop of yarn about 3 feet long by catching the yarn with the shaft of the spindle and pulling back with your thumb. [Illustration 3] Use your right hand to slide this loop next to the spit join. [Illustration 4] Keep your left hand taut and spin the spindle counterclockwise to catch all three strands. Then spin it vigorously, pushing it down
your knee (from your thigh toward your knee), catching it, and letting it rotate in your fingers. [Illustration 5]
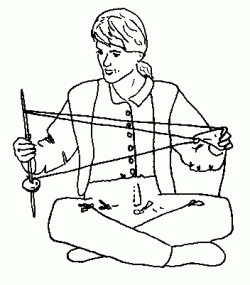 | Your left thumb is now trapped in a loop. Wind the plied yarn onto the spindle. Transfer the loop from your left thumb to the thumb and forefinger of your right hand, then use the thumb of your left hand to grab the single strand and pull it through the loop like a giant crochet chain. Pull this new loop out a full arm's length. |
Remove the thumb and forefinger of the right hand from the original loop so that it snaps shut. The left thumb is holding the new loop. Join it to the third strand of yarn and twirl the spindle down your leg until enough you add enough twist to make a balanced yarn. Then wind the plied yarn onto the spindle, continuing until your thumb (still trapped in its loop) is near the tip of the spindle. Transfer the loop to the thumb and fingers of your right hand, and use the left thumb to pull another loop.
Repeat this process until all the yarn is gone.
Making a Navajo skein
[Illustration 6] Hold your left hand above your knee. Holding the spindle with your right hand, wrap the yarn over your foot and then up over your left hand, and then back again until the spindle is empty. Tie the two ends loosely around the skein to keep it from getting tangled. Use scrap yarn to tie the skein in two more places. Remove the skein from your leg.
Making a two-ply yarn
Wind the yarn off the spindle into two diverging piles of kinky yarn, keeping track of the two ends. Sit carefully on the beginning of the yarn and lay the kinky twirls down into one pile until it looks like you're about half through. Without breaking the yarn, move over and start a second pile. You'll be back down to your original spit-join.
Tie the first end (the one you were sitting on) to the spindle near the spit-join so both ends are tied to the spindle. Put the spindle aside. Very carefully wrap both strings, one coming from each pile, around-and-around the fingers of your left hand. Be very careful that you smooth out all the kinks from both strands as you wind. When you are about halfway through, pull the ball off your hand and continue wrapping both strands of yarn in the opposite direction. Continue until all the yarn is wound.
You now have a ball of two plies ready to spin together. Starting from the outside of the ball, attach both strands to your spindle and unwind an arm's length of yarn. Twirl the spindle counterclockwise by rolling it down your knee. When the plied yarn has enough twist, wind it onto the spindle. Repeat until you've plied the entire ball of yarn.
Connie Delaney spins and writes in Salmon, Idaho. She is the producer of SpinCraft Pattern Newsletter and author of Spindle Spinning, a new book on spinning with many types of spindles from around the world, by Kokovoko Press.
